How to Configure Notifications (Webhooks) for Appointments Via API

The eAgenda platform allows you to configure webhooks to receive real-time notifications about appointment events, such as creation, updates, or cancellations. This tutorial guides you through the webhook configuration process in the eAgenda dashboard and shows how to implement a server to process these notifications via API. With practical examples based on real payloads, you can efficiently integrate notifications into your system. For more details, refer to the official documentation: eagenda.com.br.
Preparing to Configure Webhooks
Before getting started, you will need:
- Access to the eAgenda Dashboard: Log in at eagenda.com.br with an administrator account.
- Destination URL: Prepare a public URL to receive the notifications (e.g., https://yourserver.com/webhook). For testing, use tools like Ngrok.
- Authentication Token (optional): If needed, configure a token to authenticate the requests (e.g., Bearer Token).
- Testing Tools: Use cURL, Postman, or libraries such as requests (Python) to simulate notifications.
Tip: Your server must respond with an HTTP 200 OK status to confirm webhook receipt, as required by eAgenda.
Step by Step: Configuring Webhooks in the eAgenda Platform
Follow the steps below to configure a webhook in the eAgenda dashboard. Each step includes a description of the corresponding screen.
1. Access the Webhook Integrations Screen
- Log in to the eAgenda dashboard at https://eagenda.com.br.
- In the left sidebar menu, click on Integrations and select Webhook.
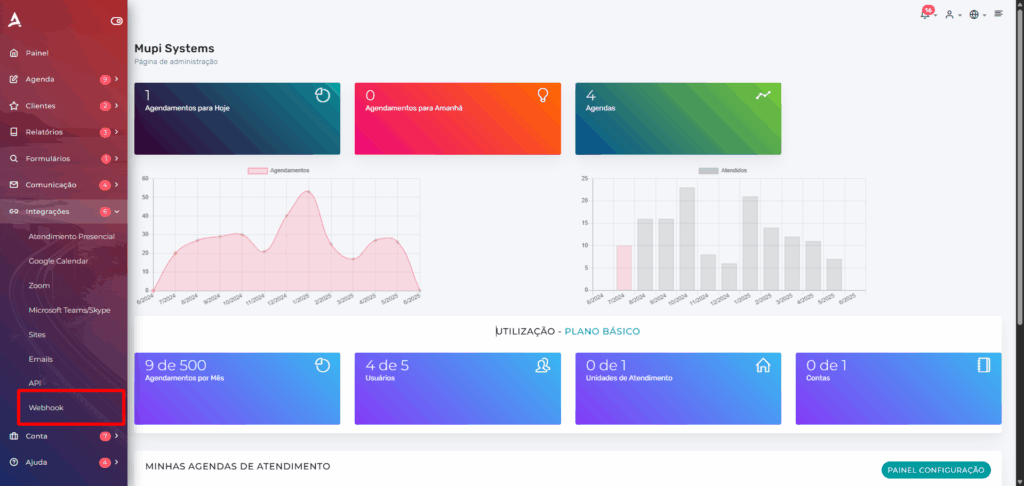
You will be directed to the Webhook Management screen, where you can view existing webhooks or add a new one.
2. Add a New Webhook
- On the Webhook Management screen, click the Add button:
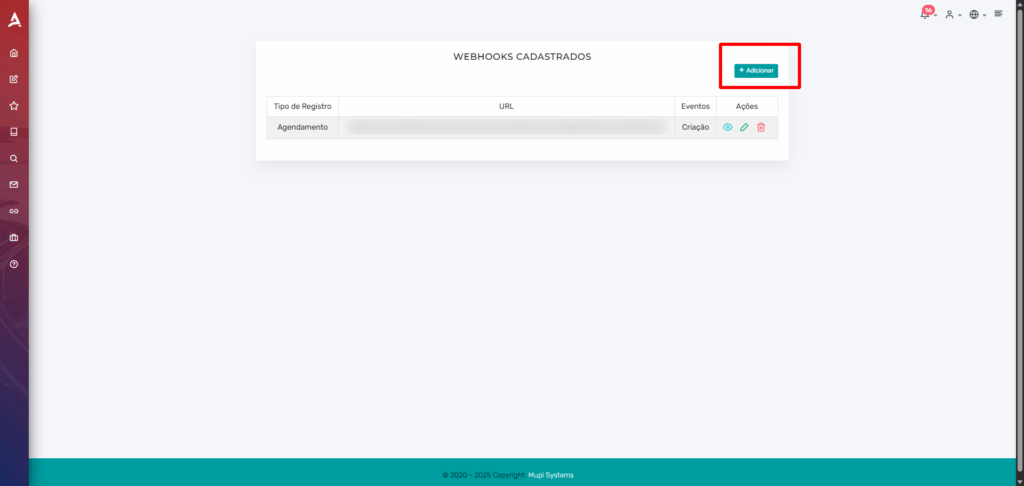
The new webhook configuration form will open.
3. Fill in the Webhook Details
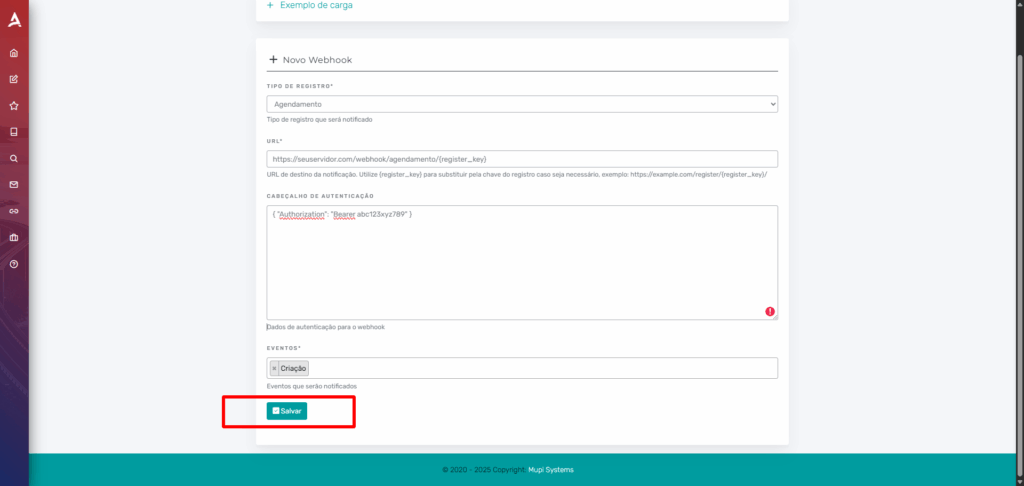
In the form, configure the required fields:
- Record Type: Select Appointment to receive notifications about appointment events.
- URL: Enter the URL of your server that will receive the notifications. Use {register_key} to include the appointment key, if needed. Example: https://yourserver.com/webhook/appointment/{register\_key}
- Authentication Header: (Optional) Add a JSON object with authentication credentials.
Example:
{ "Authorization": "Bearer abc123xyz789" } - Events: Select the desired events:
- Creation: Notifies when an appointment is created.
- Update: Notifies when an appointment is modified.
- Cancellation: Notifies when an appointment is cancelled.
- Click Save to activate the webhook.
The webhook will be active and will send notifications to the configured URL when the selected events occur.
Implementing the Webhook in Practice
After configuring the webhook, implement a server to receive and process the notifications. Below, I detail the webhook payload and provide practical examples.
Understanding the Webhook Payload
When an appointment event occurs, eAgenda sends a POST request with a JSON payload. Based on the provided example, here is a payload for an appointment update event (status ATTENDED):
{
  "event": "appointment.updated",
  "data": {
    "appointment_key": "191e1237-0240-4000-8ac1-60bcc5ae8701",
    "status": "ATTENDED",
    "calendar": {
      "calendar_key": "191e1237-0240-4000-85e4-6430bf42cf01",
      "calendar_name": "Agenda Médica"
    },
    "service_list": [
      {
        "service_key": "191e1237-0240-4000-81be-0e5d361a8501",
        "service_name": "Consulta Geral"
      }
    ],
    "attendees": [
      {
        "person_key": "191e1237-0240-4000-8584-d036c75a2f80",
        "name": "João Silva",
        "email": "joao.silva@example.com"
      }
    ],
    "start": {
      "dateTime": "2025-06-10T10:00:00Z",
      "timeZone": "America/Sao_Paulo"
    },
    "end": {
      "dateTime": "2025-06-10T10:30:00Z",
      "timeZone": "America/Sao_Paulo"
    }
  },
  "timestamp": "2025-06-10T10:35:00Z"
}- event: Identifies the event type (appointment.created, appointment.updated, appointment.canceled).
- data: Contains the appointment details, such as appointment_key, status, calendar, and service_list.
- timestamp: Event date and time (ISO 8601 format).
Webhook Server Example (Python with Flask)
Create a Flask server to process webhook notifications:
from flask import Flask, request, jsonify

app = Flask(__name__)

@app.route('/webhook/agendamento/<register_key>', methods=['POST'])
def handle_webhook(register_key):
    # Verify authentication
    auth_header = request.headers.get('Authorization')
    expected_auth = 'Bearer abc123xyz789'
    if auth_header != expected_auth:
        return jsonify({"error": "Invalid authentication"}), 401

    # Receive the payload
    try:
        payload = request.get_json()
        event = payload.get('event')
        data = payload.get('data', {})
        appointment_key = data.get('appointment_key')
        status = data.get('status')
    except Exception as e:
        return jsonify({"error": f"Payload error: {str(e)}"}), 400

    # Process the event
    if event == 'appointment.created':
        print(f"New appointment: {appointment_key}, Status: {status}")
    elif event == 'appointment.updated':
        print(f"Appointment updated: {appointment_key}, Status: {status}")
    elif event == 'appointment.canceled':
        print(f"Appointment cancelled: {appointment_key}")

    # Return success
    return jsonify({"status": "received", "message": "Notification processed"}), 200

if __name__ == '__main__':
    app.run(host='0.0.0.0', port=5000)
How to use:
- Install Flask: pip install flask.
- Configure the webhook URL in eAgenda as https://yourserver.com/webhook/agendamento/{register\_key}.
- Run the server locally or publish with Ngrok for testing.
This server validates the authentication, processes the payload, and logs the event. You can expand it to save data to a database or integrate with other systems.
Testing the Webhook with cURL
Simulate a notification to test the server, using the provided payload:
curl -X POST https://yourserver.com/webhook/agendamento/191e1237-0240-4000-8ac1-60bcc5ae8701 \
-H "Content-Type: application/json" \
-H "Authorization: Bearer abc123xyz789" \
-d '{
  "event": "appointment.updated",
  "data": {
    "appointment_key": "191e1237-0240-4000-8ac1-60bcc5ae8701",
    "status": "ATTENDED",
    "calendar": {
      "calendar_key": "191e1237-0240-4000-85e4-6430bf42cf01",
      "calendar_name": "Agenda Médica"
    },
    "service_list": [
      {
        "service_key": "191e1237-0240-4000-81be-0e5d361a8501",
        "service_name": "Consulta Geral"
      }
    ],
    "attendees": [
      {
        "person_key": "191e1237-0240-4000-8584-d036c75a2f80",
        "name": "João Silva",
        "email": "joao.silva@example.com"
      }
    ],
    "start": {
      "dateTime": "2025-06-10T10:00:00Z",
      "timeZone": "America/Sao_Paulo"
    },
    "end": {
      "dateTime": "2025-06-10T10:30:00Z",
      "timeZone": "America/Sao_Paulo"
    }
  },
  "timestamp": "2025-06-10T10:35:00Z"
}'
Verifying the Operation
The server should respond with:
{
  "status": "received",
  "message": "Notification processed"
}- Error codes:
- 401 Unauthorized: Invalid authentication token.
- 400 Bad Request: Malformed payload.
In the eAgenda dashboard, access the Webhooks screen to check the delivery history. Check the server logs to confirm payload processing.
Conclusion
In this tutorial, you learned how to configure webhooks in the eAgenda platform to receive real-time notifications about appointments and how to implement a server to process them. Using the provided payload, you can integrate events such as appointment creation, updates, or cancellations with your systems, optimizing workflows. For more resources, refer to the API documentation.
Contact Us or Learn More
We are here to help! Access our official channels:
📞 WhatsApp : Click here to send us a message 🌐 eAgenda Platform : Discover eAgenda 🏢 Our Company : Mupi Systems – Innovative Solutions 📧 Email : contato@mupisystems.com.br 📚 Tutorials and Documentation : Access our guides and tutorials