How to Configure the Scheduling Screen on eAgenda
In this tutorial, we will show you how to configure your scheduling screen on eAgenda. This configuration is essential for creating a customized scheduling page. The page works as a landing page, offering a simple and effective experience for users to make their appointments.
Step by Step: How to Modify the Scheduling Screen
1. Open the Side Menu and click on Account → Scheduling Screen;
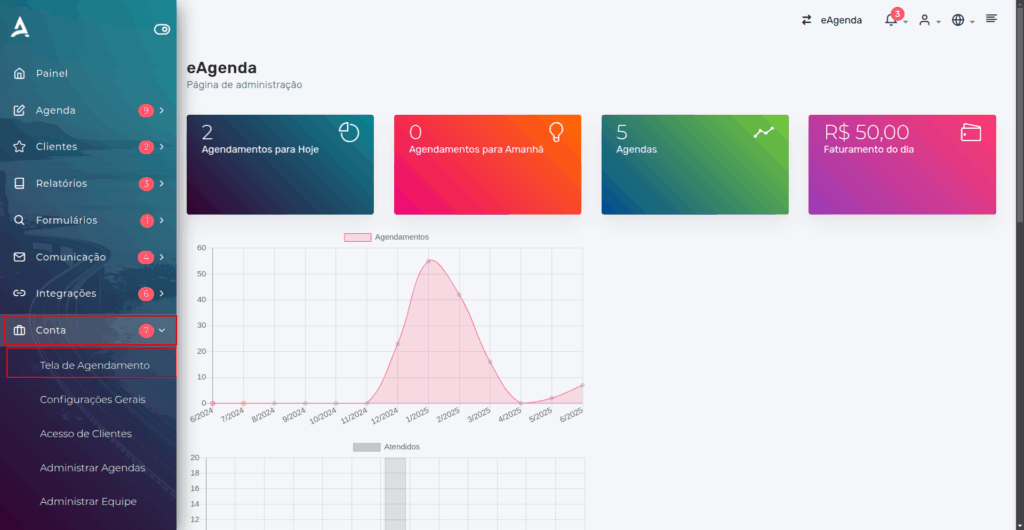
You will be redirected to the Scheduling Screen tab. On this screen, you can define and customize the scheduling screen.
Step 1: General Data Configuration
In this first step, you will configure the general data for your scheduling page. These settings are essential for customizing the appearance and functionality of your scheduling screen, such as the company name, URL abbreviation, and display of additional details. Below, we explain the fields you need to fill in to complete this configuration.
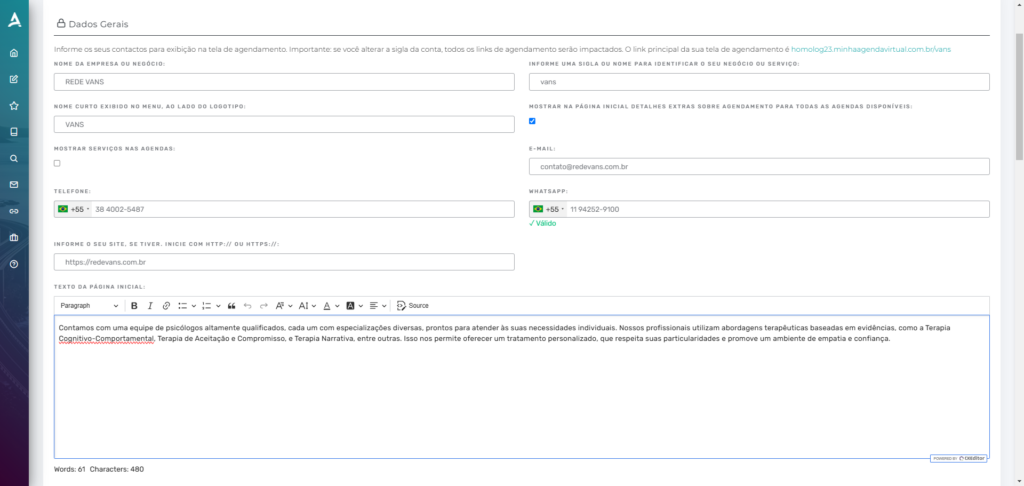
- Company or business name: Define the full name that will be displayed in the page title.
- Example: REDE VANS
- Abbreviation or name to identify your business: Define an abbreviation that will be used in the scheduling page URL.
- Example: vans
- Short name in menu: Define the abbreviated name that will appear next to the logo.
- Example: VANS
- Show extra details about scheduling: Allows displaying additional information about appointments directly on the home page.
- Show services in schedules: If you have specific services, this option allows them to be displayed in the scheduling calendars.
- Home Page Text: Add a brief description about your business or service, which will be visible on the home page.
- Example: We have a team of highly qualified psychologists, ready to meet your needs.
Important: Changing the abbreviation will affect all scheduling links. The main link in this example: minhaagendavirtual.com.br/vans.
Schedule Groups (Optional)
In this step, you can create a sequential flow on the scheduling screen, making it easier for the user to find the right schedule. The flow can have 1 to 3 steps, and the goal is to organize the schedules so that the user selects options intuitively. The schedules will be linked in the last step of the flow, ensuring that the scheduling process is quick and efficient.
How to Add a Step
When you click Add Step 1, follow the steps below to configure the step correctly:

On the next screen, you will need to fill in the fields to create a flow with schedule steps. Follow the steps below:
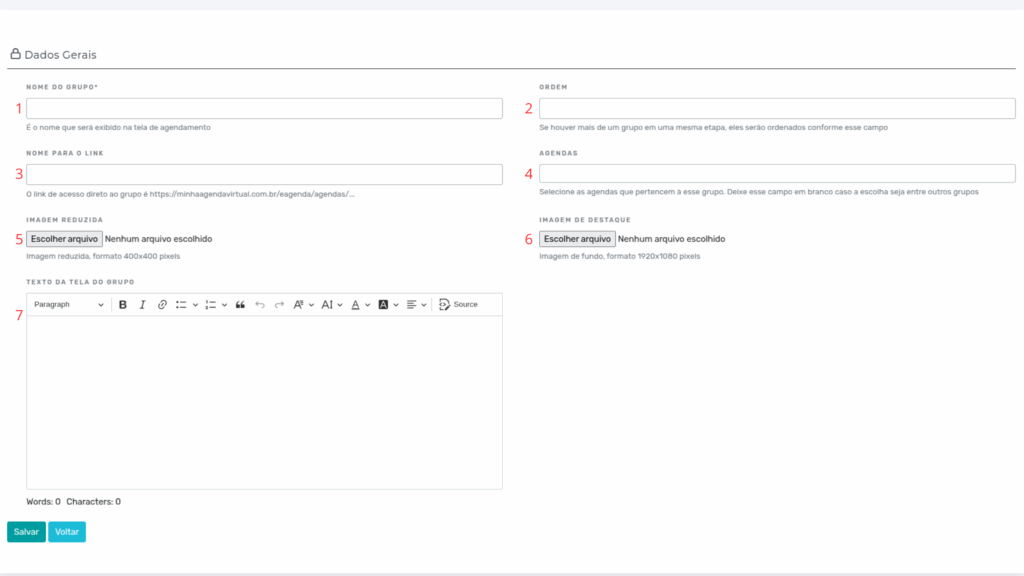
- Group Name: Define a representative name for the step, such as “HR”, “Sales”, or “Support”.
- Step Order: Indicate the position of this step in the scheduling flow, determining in what order it will be displayed relative to the others.
- Link Name: Enter an abbreviation or tag that will be used in the page URL. For example:
eagenda.com.br/grupos/rh, where “rh” is the defined abbreviation. - Schedules: Select the schedules that belong to this group or department. For example, for a step called “Support”, associate the schedules related to the support team.
- Reduced Image: Featured image optimized for mobile devices.
- Featured Image: Main image that will be displayed on all devices, especially recommended for desktop viewing.
- Group Screen Text: Enter a brief description explaining the purpose of the step within the scheduling flow, helping users understand its function.
When finished, simply click Save to apply all settings and create the step flow for the schedules.
Color Palette
In the second step, you can customize the appearance of your scheduling screen with colors and images. This will help make the page more attractive and aligned with your business’s visual identity.
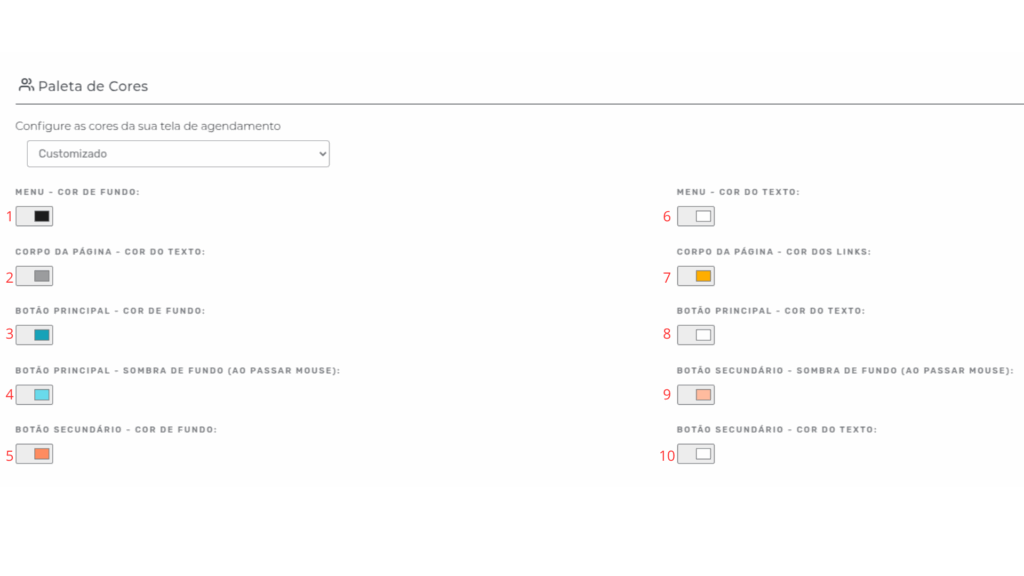
- Header and Footer Background Color:
- Change the header and footer background color of the page to match your visual style.
- Page Body Background Color:
- Modify the background color of the main area of the page, where the content will be displayed.
- Primary Button Background Color:
- Define the background color of the primary button, the one that draws attention to important actions.
- Primary Button Shadow Color:
- Adjust the shadow color that appears when hovering over the primary button, creating an attractive visual effect.
- Secondary Button Background Color:
- Select the background color for secondary buttons, which are used for less priority actions.
- Header and Footer Text Color:
- Define the text color that appears in the header and footer of the page, ensuring good visibility and contrast.
- Link Color:
- Choose the link color so they stand out appropriately within the page content.
- Primary Button Text Color:
- Adjust the text color inside the primary button to ensure readability and harmony with the background.
- Secondary Button Shadow Color:
- Change the shadow color that appears when hovering over the secondary button, creating an interesting visual interaction.
- Secondary Button Text Color:
- Define the text color inside the secondary button to ensure it has good visibility and contrast with the background.
With these customization options, you can create a scheduling screen that reflects your business’s visual identity and improves the user experience.
Images
In this step, you can customize the visual elements of your scheduling page, including the logo, banners, and other images. Here are the options you can adjust:
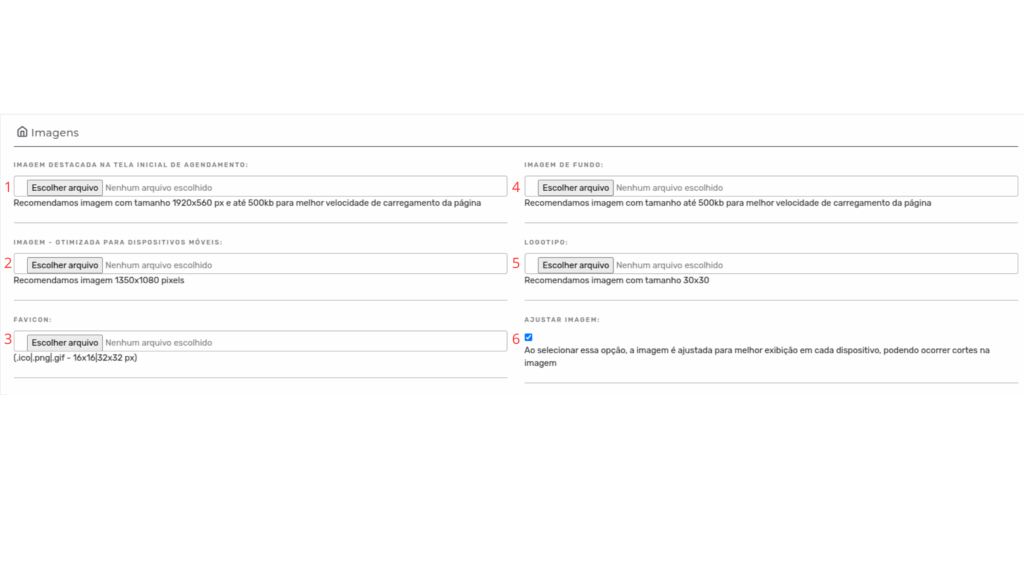
Featured Image on the Scheduling Home Screen: In the first field, you will define a banner that will be the initial highlight of the scheduling screen. This image will appear prominently at the top of the page, providing a good first impression for users.
Featured Image on the Scheduling Home Screen (Mobile):
You will define a banner that will be the initial highlight of the scheduling screen for mobile devices. This image will appear prominently at the top of the page, providing a good first impression for users.
Favicon: In the fourth field, you can define the page’s favicon — the small icon displayed in the browser tab. It helps make your page more recognizable and reinforces your brand’s visual identity.
Background Image: In the third field, you can choose a background image for the scheduling screen. This will help customize the page and make it more aligned with your company’s visual design.
Logo: In this field, you will define your company or service logo, which will be displayed in the page header. The logo is an important visual element to reinforce your brand identity.
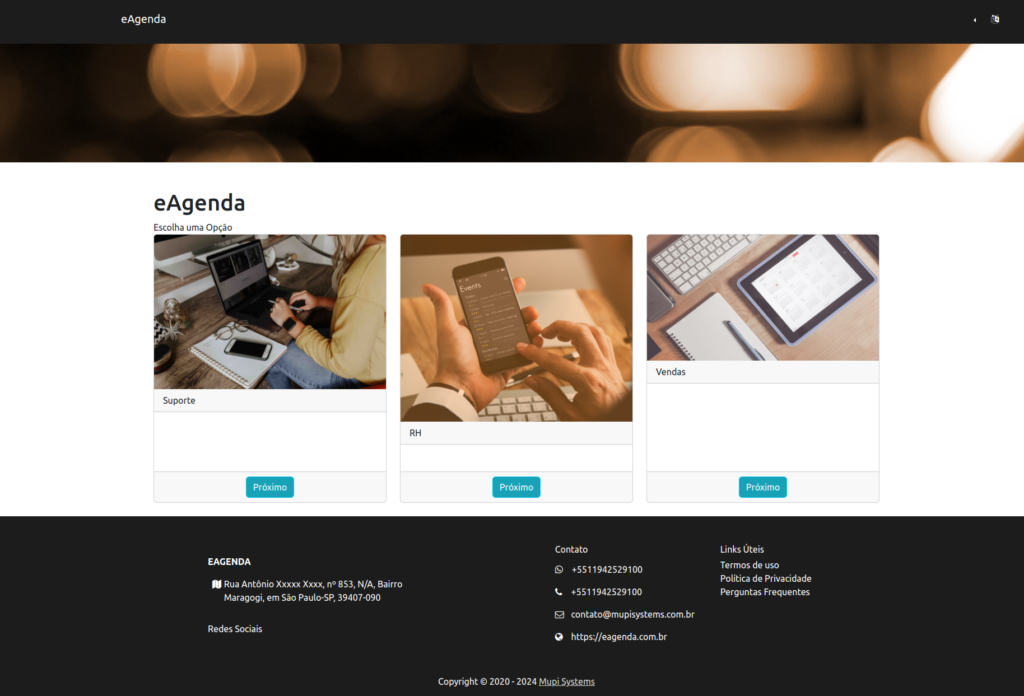
Result
After saving the data, here is an example of the result after filling in the fields.
In this tutorial, you learned how to customize the Scheduling Screen on the eAgenda platform, creating a professional and intuitive landing page for your clients. The customization allows you to adjust the company name, URL abbreviation, page visual, schedule groups, colors, images, and even scheduling flows with multiple steps.
Beyond visual identity, you can also better organize services and schedules, making navigation easier for users and making the scheduling process more efficient.
With this feature, you improve the client experience, strengthen your brand identity, and optimize online scheduling management.
Mupi Systems offers a range of technological solutions for all types of businesses. Discover our platforms that bring innovation to the market.
Get in Touch or Learn More
📞 WhatsApp: [Click here to send us a message] 🌐 eAgenda Platform: [Discover the tool] 🏢 Our Company: [Mupi Systems – Innovative Solutions] 📧 Email: [contato@mupisystems.com.br] 📚 Tutorials and Documentation: [Access our guides and tutorials]