Complete Guide to the eAgenda Dashboard
In this tutorial, we will explore the platform’s Dashboard, where you can quickly access appointments, manage the consumption of each plan’s items, and use various features efficiently. The dashboard was designed to optimize access to the main tools, providing efficient and intuitive navigation.
Appointments and Calendars
In addition to being informative, the menu also serves as a visual shortcut, allowing quick access to various options, such as listing today’s appointments or directly accessing your calendars. It makes navigation easier, making management more agile and efficient.

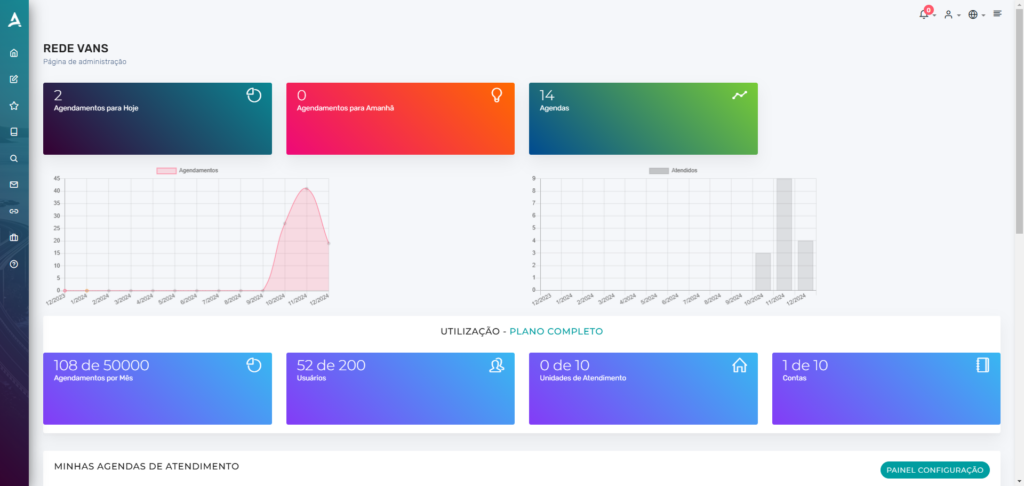
- Appointments for Today: Displays the number of appointments scheduled for the current day, allowing you to quickly view the day’s appointments.
- Appointments for Tomorrow: Shows the number of appointments scheduled for the next day, making it easier to plan ahead.
- Calendars: Displays the total number of calendars registered in your account, providing an overview of the calendars available for scheduling.

Total Monthly Appointments Chart: Displays the total number of appointments made during the month, providing a clear view of the number of scheduled commitments.
Monthly Attended Appointments Chart: Shows the number of appointments that were effectively attended throughout the month, helping to evaluate the fulfillment of scheduled commitments.
Plan Usage
At the bottom of the dashboard, in addition to displaying information about the plan in use on the account, it also provides details about resource usage, such as appointments, users, service locations, and accounts, allowing clear and efficient tracking of each item’s consumption within your plan.

- Appointments per Month: Displays the number of appointments made in the month compared to the plan’s limit, for example, 108 out of 50,000 allowed appointments.
- Users: Shows the number of users registered in the system, with the limit available in the plan, such as 52 out of 200 users.
- Service Locations: Indicates the number of service locations or units configured, such as 0 out of 10 allowed units.
- Accounts: Represents the number of accounts created or linked to the plan, with the total available limit, for example, 1 out of 10 accounts.
Finally, you can view a complete summary of each calendar, with the following information:
- Calendar: Calendar name.
- Appointments Today: Number of appointments for the current day.
- Appointments Tomorrow: Number of appointments for the next day.
- Appointments Next 7 Days: Number of appointments in the next seven days.
- Occupancy Rate Next 7 Days: Percentage of calendar occupancy over the next seven days.
- Status: Current status of the calendar (for example, available, full, etc.).
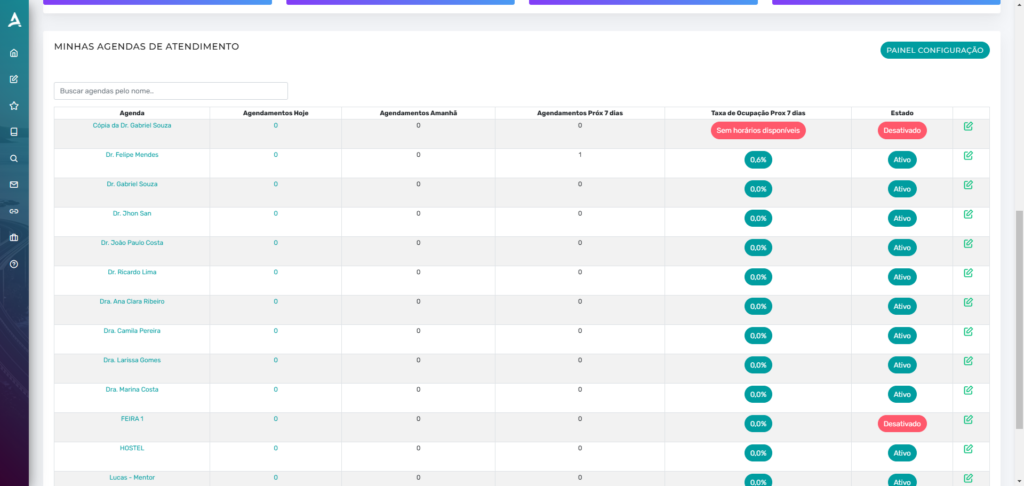
These summaries allow you to quickly and efficiently track the status and schedule of each calendar.
Top Menu
In addition to using the side menu to access the platform’s other settings, you can use the top menu for additional features. Through it, you can:
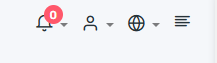
- Access account settings.
- View notifications about new updates and blog posts.
- Change the platform language easily.
- Quickly check recent appointments.
In summary, in this tutorial you learned how the platform’s dashboard works. Take the opportunity to visit our Blog to answer other questions, or check out our YouTube channel.
Mupi Systems offers a range of technology solutions for all types of businesses. Discover our platforms that bring innovation to the market.